Обычно разработчики шаблонов добавляют дату и год в подвале сайта. Как правило, эти цифры автоматически меняются в зависимости от времени на сервере. Вы наверняка встречали подобное, практически каждый сайт в интернете имеет как минимум одну цыфру - действующий год, а где-то можно увидеть и дату основания ресурса. Но сейчас мы поговорим о создании часов и таймера для сайта. И подобно дате они будут идти опираясь на время вашего компьютера.
Часы на HTML
Так почему же часы будут работать, опираясь на время с компьютера пользователя? Дело в том, что на сервере время и дата отличаются от времени на вашем компьютере.
Наши часы цифрового типа будут иметь мерцающие точки. Анимация не обязательна, но с ней смотрится интересней, стили по ходу вы можете менять.

Создайте на рабочем столе папку Clock и положите в нее файлы index.html и style.css. Для того чтобы их создать воспользуйтесь программой NotePade++.
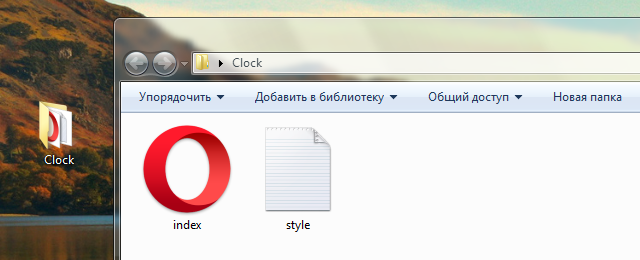
Откройте файлы в программе, добавьте следующий код в index.html, а после сохранитесь.
-
<!DOCTYPE HTML>
-
<html>
-
<head>
-
<meta http-equiv="Content-Type" content="text/html; charset=utf-8">
-
<title>Digital Clock</title>
-
-
<link rel="stylesheet" type="text/css" href="style.css">
-
<script src="https://ajax.googleapis.com/ajax/libs/jquery/2.2.4/jquery.min.js"></script>
-
</head>
-
-
<body>
-
<script type="text/javascript">
-
$(document).ready(function() {
-
var monthNames = [ "January", "February", "March", "April", "May", "June", "July", "August", "September", "October", "November", "December" ];
-
var dayNames= ["Sunday","Monday","Tuesday","Wednesday","Thursday","Friday","Saturday"]
-
var newDate = new Date();
-
newDate.setDate(newDate.getDate());
-
$('#Date').html(dayNames[newDate.getDay()] + " " + newDate.getDate() + ' ' + monthNames[newDate.getMonth()] + ' ' + newDate.getFullYear());
-
setInterval( function() {
-
var seconds = new Date().getSeconds();
-
$("#sec").html(( seconds < 10 ? "0" : "" ) + seconds);
-
},1000);
-
setInterval( function() {
-
var minutes = new Date().getMinutes();
-
$("#min").html(( minutes < 10 ? "0" : "" ) + minutes);
-
},1000);
-
setInterval( function() {
-
var hours = new Date().getHours();
-
$("#hours").html(( hours < 10 ? "0" : "" ) + hours);
-
}, 1000);
-
});
-
</script>
-
<div>
-
<div id="Date"></div>
-
<ul>
-
<li id="hours"> </li>
-
<li id="point">:</li>
-
<li id="min"> </li>
-
<li id="point">:</li>
-
<li id="sec"> </li>
-
</ul>
-
</div>
-
</body>
-
</html>
Для style.css используйте это:
-
body{
-
background: #8ba1b7;
-
font: bold 12px Arial, Helvetica, sans-serif;
-
margin: 0;
-
padding: 0;
-
min-width: 960px;
-
}
-
a {
-
text-decoration:none;
-
color:#00c6ff;
-
}
-
h1 {
-
font: 4em normal Arial, Helvetica, sans-serif;
-
padding: 20px; margin: 0;
-
text-align:center;
-
}
-
h1 small{
-
font: 0.2em normal Arial, Helvetica, sans-serif;
-
text-transform:uppercase; letter-spacing: 0.2em; line-height: 5em;
-
display: block;
-
}
-
h2 {
-
font-weight:700;
-
color:#bbb;
-
font-size:20px;
-
}
-
h2, p {
-
margin-bottom:10px;
-
}
-
@font-face {
-
font-weight: normal;
-
font-style: normal;
-
}
-
.clock {
-
width: 800px;
-
margin: 60px auto;
-
padding: 20px;
-
color: #fff;
-
}
-
#Date {
-
font-family: Arial, Helvetica, sans-serif;
-
font-size: 1.3em;
-
text-align: center;
-
}
-
ul {
-
width: 650px;
-
margin: 10px auto;
-
padding: 0px;
-
list-style: none;
-
text-align: center;
-
background: #657e96;
-
border-radius: 10px;
-
box-shadow: rgba(255, 255, 255, 0.3) 0px 0px 15px 5px;
-
}
-
ul li {
-
display: inline;
-
font-size: 10em;
-
text-align: center;
-
font-family: Arial, Helvetica, sans-serif;
-
}
-
#point {
-
position: relative;
-
-moz-animation: mymove 1s ease infinite;
-
-webkit-animation: mymove 1s ease infinite;
-
padding-left: 10px;
-
padding-right: 10px;
-
}
-
@-webkit-keyframes mymove {
-
0% {opacity:1.0;}
-
50% {opacity:0;}
-
100% {opacity:1.0;}
-
}
-
@-moz-keyframes mymove {
-
0% {opacity:1.0;}
-
50% {opacity:0;}
-
100% {opacity:1.0;}
-
}
Вот и все, откройте index.html в браузере и увидите часы.
Установка часов вшаблон Joomla
Теперь внедрим наши часы в шаблон protostar. Распологаться они будут в верхней части сайта, в шапке. внешний вид также изменим, поправив таблицу стилей, сделаем компактней.

Находим на вашем сервере следующие файлы и скачиваем на компьютер:
index.php - путь по умолчанию …/templates/protostar/Index.php
template.css - путь по умолчанию …/templates/protostar/css/template.css
Используем любой FTP клиент, к примеру FileZilla, а после открываем в NotePad++. В файле templates.css опускаемся в самый низ и добовлеем:
-
/* Clock */
-
.clock {
-
width: 250px;
-
margin: 20px auto;
-
padding: 15px;
-
color: #ffffff;
-
border-radius: 5px;
-
background: #1b668f;
-
box-shadow: #778e9a 0px 4px 10px 0px;
-
}
-
.clock ul {
-
margin: 5px auto;
-
padding: 0px;
-
list-style: none;
-
text-align: center;
-
}
-
.clock ul li {
-
display: inline;
-
font-size: 1em;
-
text-align: center;
-
font-family: Arial, Helvetica, sans-serif;
-
}
-
#Date {
-
font-family: Arial, Helvetica, sans-serif;
-
font-size: 1.3em;
-
text-align: center;
-
}
-
#point {
-
position: relative;
-
-moz-animation: mymove 1s ease infinite;
-
-webkit-animation: mymove 1s ease infinite;
-
padding-left: 1px;
-
padding-right: 1px;
-
}
-
@-webkit-keyframes mymove {
-
0% {opacity:1.0;}
-
50% {opacity:0;}
-
100% {opacity:1.0;}
-
}
-
@-moz-keyframes mymove {
-
0% {opacity:1.0;}
-
50% {opacity:0;}
-
100% {opacity:1.0;}
-
}
Сохрнаив вы можете вернуть его на место …/templates/protostar/css/template.css. Далее, открыв index.php, находите тег <body> и вставляете этот код после него:
-
<script src="https://ajax.googleapis.com/ajax/libs/jquery/2.2.4/jquery.min.js"></script>
-
<script type="text/javascript">
-
jQuery(document).ready(function() {
-
var monthNames = [ "January", "February", "March", "April", "May", "June", "July", "August", "September", "October", "November", "December" ];
-
var dayNames= ["Sunday","Monday","Tuesday","Wednesday","Thursday","Friday","Saturday"]
-
var newDate = new Date();
-
newDate.setDate(newDate.getDate());
-
jQuery('#Date').html(dayNames[newDate.getDay()] + " " + newDate.getDate() + ' ' + monthNames[newDate.getMonth()] + ' ' + newDate.getFullYear());
-
setInterval( function() {
-
var seconds = new Date().getSeconds();
-
jQuery("#sec").html(( seconds < 10 ? "0" : "" ) + seconds);
-
},1000);
-
setInterval( function() {
-
var minutes = new Date().getMinutes();
-
jQuery("#min").html(( minutes < 10 ? "0" : "" ) + minutes);
-
},1000);
-
setInterval( function() {
-
var hours = new Date().getHours();
-
jQuery("#hours").html(( hours < 10 ? "0" : "" ) + hours);
-
}, 1000);
-
});
-
</script>
-
<div>
-
<div id="Date"></div>
-
<ul>
-
<li id="hours"> </li>
-
<li id="point">:</li>
-
<li id="min"> </li>
-
<li id="point">:</li>
-
<li id="sec"> </li>
-
</ul>
-
</div>
Мы это сделали сразу после класса body, но вы можете установить куда хотите.
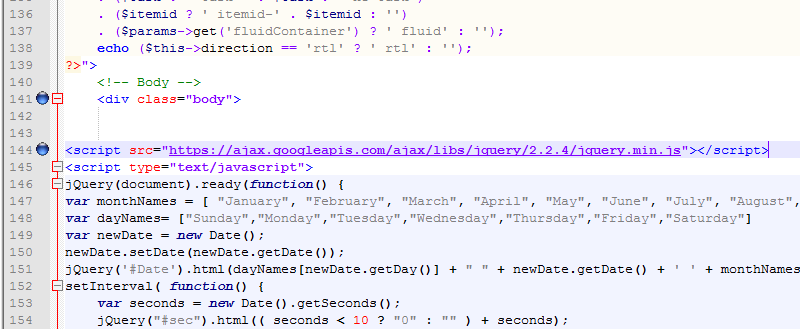
Возвращаем наш index.php назад …/templates/protostar/Index.php.
Если вы обратили внимание на скрипт в первых 2 примерах, то могли заметить что на 3 и 4 строчке идет перечисление дней недели и месяцев.
-
var monthNames = [ "January", "February", "March", "April", "May", "June", "July", "August", "September", "October", "November", "December" ];
-
var dayNames= ["Sunday","Monday","Tuesday","Wednesday","Thursday","Friday","Saturday"]
Можете поменять слова на русский вариант, месяцы и днибудут тогда понятны вашему посетителю.
Создание страницы с таймером обратного отсчета
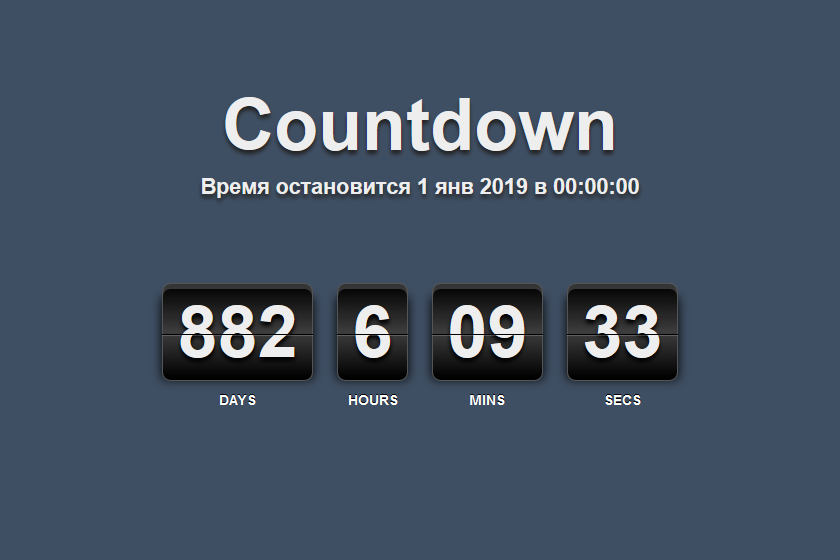
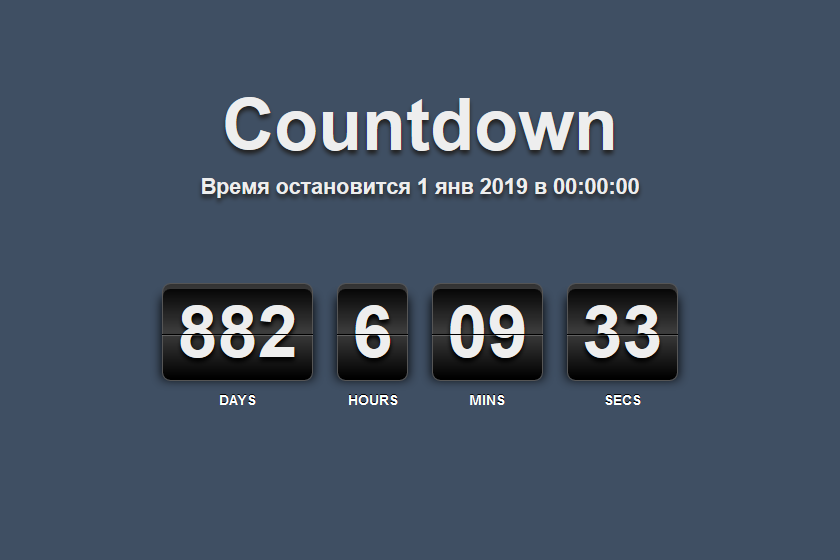
Создавать таймер обратного отсчета мы будем в обход движка, в корень поместим необходимые файлы и добавим пункт меню на сайте с внешней ссылкой. А так как движок не отвечает за показ страницы, то не нужно беспокоиться по поводу конфликта скриптов. Для начала создайте папку с названием countdown на рабочем столе. Имейте в виду, если название напишите с большими буквами, то и ссылку придется вставлять с такими же. Создаем такие файлы: index.html, style.css, countdown.js и забрасываем их в нашу папку

В index.html вставляем:
-
<!DOCTYPE html>
-
<html>
-
<head>
-
<meta charset="utf-8">
-
<title>Countdown</title>
-
<link rel="stylesheet" media="screen" href="style.css" />
-
<script src="countdown.js"></script>
-
</head>
-
-
<body>
-
<div>
-
<h1>Countdown</h1>
-
<h2>Время остановится 1 янв 2019 в 00:00:00</h2>
-
<div id="CDT"></div>
-
</div>
-
</body>
-
</html>
В style.css:
-
body {
-
background: #3f4f63;
-
color: #fff;
-
-moz-text-shadow: 0 -1px 0 #000;
-
-webkit-text-shadow: 0 -1px 0 #000;
-
text-shadow: 0 -1px 0 #000;
-
font-family: 'Helvetica Neue','Helvetica','Arial', sans-serif;
-
}
-
.container {
-
text-align: center;
-
margin: 0 auto;
-
width: 800px;
-
height: 400px;
-
position: absolute;
-
top: 50%;
-
left: 50%;
-
margin: -200px 0 0 -400px;
-
}
-
h1,
-
h2 {
-
margin: 0;
-
color: #eee;
-
-moz-text-shadow: 0 3px 3px #000000;
-
-webkit-text-shadow: 0 3px 3px #000000;
-
text-shadow: 0 3px 3px #000000;
-
}
-
h1 {
-
font-size: 60px;
-
margin: 0 0 10px;
-
line-height: 1;
-
}
-
h2 {
-
font-size: 18px;
-
}
-
#CDT {
-
font-size: 60px;
-
color: #eee;
-
margin: 70px 0 100px;
-
font-weight: bold;
-
}
-
#CDT .number-wrapper {
-
margin: 10px;
-
-moz-box-shadow: 0 5px 8px #000000;
-
-webkit-box-shadow: 0 5px 8px #000000;
-
box-shadow: 0 5px 8px #000000;
-
position: relative;
-
}
-
#CDT .number {
-
display: inline-block;
-
*display: inline;
-
*zoom: 1;
-
background: #000;
-
background-image: linear-gradient(bottom, #000000 2%, #3c3c3c 50%, #000000 100%);
-
background-image: -o-linear-gradient(bottom, #000000 2%, #3c3c3c 50%, #000000 100%);
-
background-image: -moz-linear-gradient(bottom, #000000 2%, #3c3c3c 50%, #000000 100%);
-
background-image: -webkit-linear-gradient(bottom, #000000 2%, #3c3c3c 50%, #000000 100%);
-
background-image: -ms-linear-gradient(bottom, #000000 2%, #3c3c3c 50%, #000000 100%);
-
-webkit-border-top-right-radius: 7px;
-
-webkit-border-bottom-right-radius: 0;
-
-webkit-border-bottom-left-radius: 0;
-
-webkit-border-top-left-radius: 0;
-
-moz-border-radius-topright: 7px;
-
-moz-border-radius-bottomright: 0;
-
-moz-border-radius-bottomleft: 0;
-
-moz-border-radius-topleft: 0;
-
border-top-right-radius: 7px;
-
border-bottom-right-radius: 0;
-
border-bottom-left-radius: 0;
-
border-top-left-radius: 0;
-
-webkit-border-radius: 7px;
-
-moz-border-radius: 7px;
-
border-radius: 7px;
-
-moz-background-clip: padding;
-
-webkit-background-clip: padding-box;
-
background-clip: padding-box;
-
padding: 0 12px;
-
height: 80px;
-
line-height: 80px;
-
text-align: center;
-
border: 1px solid #555;
-
-moz-box-shadow: inset 0 4px 0 rgba(255, 255, 255, 0.2);
-
-webkit-box-shadow: inset 0 4px 0 rgba(255, 255, 255, 0.2);
-
box-shadow: inset 0 4px 0 rgba(255, 255, 255, 0.2);
-
-moz-text-shadow: 0 3px 3px #000000;
-
-webkit-text-shadow: 0 3px 3px #000000;
-
text-shadow: 0 3px 3px #000000;
-
}
-
#CDT .line {
-
position: absolute;
-
width: 100%;
-
height: 1px;
-
top: 52%;
-
left: 0;
-
background: #000;
-
-moz-box-shadow: 0 1px 0 rgba(255, 255, 255, 0.2);
-
-webkit-box-shadow: 0 1px 0 rgba(255, 255, 255, 0.2);
-
box-shadow: 0 1px 0 rgba(255, 255, 255, 0.2);
-
}
-
.caption {
-
font-size: 12px;
-
position: absolute;
-
bottom: -30px;
-
left: 0;
-
text-align: center;
-
width: 100%;
-
color: #fff;
-
}
В coundown.js:
-
function CountdownTimer(elm,tl,mes){
-
this.initialize.apply(this,arguments);
-
}
-
CountdownTimer.prototype={
-
initialize:function(elm,tl,mes) {
-
this.elem = document.getElementById(elm);
-
this.tl = tl;
-
this.mes = mes;
-
},countDown:function(){
-
var timer='';
-
var today=new Date();
-
var day=Math.floor((this.tl-today)/(24*60*60*1000));
-
var hour=Math.floor(((this.tl-today)%(24*60*60*1000))/(60*60*1000));
-
var min=Math.floor(((this.tl-today)%(24*60*60*1000))/(60*1000))%60;
-
var sec=Math.floor(((this.tl-today)%(24*60*60*1000))/1000)%60%60;
-
var me=this;
-
if( ( this.tl - today ) > 0 ){
-
timer += '<span><div></div><div>DAYS</div><span>'+day+'</span></span>';
-
timer += '<span><div></div><div>HOURS</div><span>'+hour+'</span></span>';
-
timer += '<span><div></div><div>MINS</div><span>'+this.addZero(min)+'</span></span><span><div></div><div>SECS</div><span>'+this.addZero(sec)+'</span></span>';
-
this.elem.innerHTML = timer;
-
tid = setTimeout( function(){me.countDown();},10 );
-
}else{
-
this.elem.innerHTML = this.mes;
-
return;
-
}
-
},addZero:function(num){ return ('0'+num).slice(-2); }
-
}
-
function CDT(){
-
-
// Set countdown limit
-
var tl = new Date('2019/01/01 00:00:00');
-
-
// You can add time's up message here
-
var timer = new CountdownTimer('CDT',tl,'<span><div></div><span>Time is up!</span></span>');
-
timer.countDown();
-
}
-
window.onload=function(){
-
CDT();
-
}
Обратите внимание на скрипт, а точнее на его нижнюю часть:
-
function CDT(){
-
-
// Set countdown limit
-
var tl = new Date('2019/01/01 00:00:00');
-
-
// You can add time's up message here
-
var timer = new CountdownTimer('CDT',tl,'<span><div></div><span>Time is up!</span></span>');
-
timer.countDown();
-
}
Тут выставляется дата и время окончания отсчета, а также выводимое сообщение после.
После того как вы сохраните все файлы, папку countdown необходимо разместить в корень сайта.
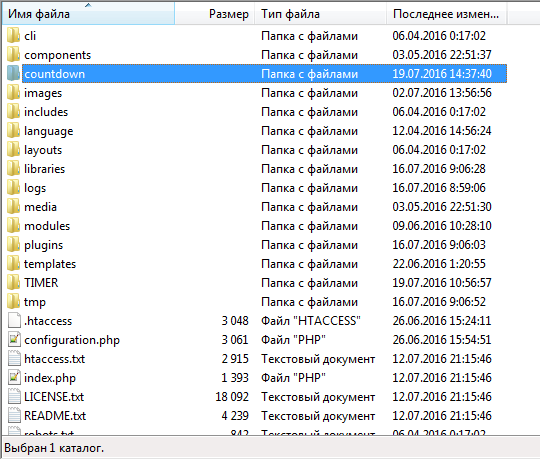
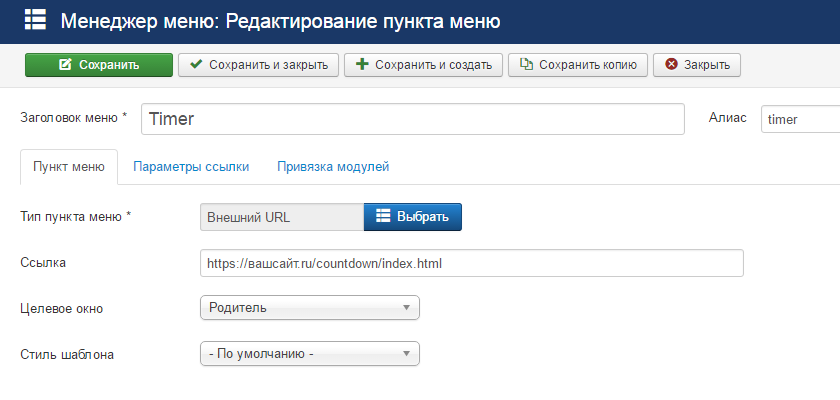
Теперь наш таймер доступен по прямой ссылке http://вашсайт.ru/countdown/index.html.. Остается только создать пункт меню в панели управления и добавить туда эту ссылку, чтобы страница стала доступна всем. Делать это нужно в "Панель управления>Выбираем основое меню>Создать пункт меню", дальше заполняем заголовок, выбираем тип "Внешний URL" и добавляем ссылку.
